


How can I get a student's exception account in myLexia to sync with their ClassLink account?
Overview
If your school or district uses ClassLink to automatically create and update student information in myLexia®, there may be manually-created exception student accounts in myLexia that are not updated by the automated import.
Linking a student's existing exception account to their ClassLink account will preserve their Lexia history, and allow their account to sync with the automated import.
For more information on troubleshooting student exception accounts, see Automated Sync Troubleshooting: Student Exception Accounts.
Applies to: Staff who have myLexia® administrative accounts (District Administrators in a district site, and School Administrators in a school site) who also have administrative access to ClassLink.
How can I get a student's exception account to sync with their ClassLink account?
 Confirm that the student has an exception account in myLexia

In myLexia, select Manage.
Select Students.
Search for the student, using the search box for Student Name or Username.
Select the pencil icon to the right of the student's name.
If you don’t find the student account in the Manage → Students list, select the Archive tab and search the archive for the student.
If you find the account in the archive, select the square next to the student’s name, select Restore, and go to Manage → Students again to find the student.
In the Edit Student window, check the RefID field. If the RefID starts with EX, it is an exception account.
 Prepare the spreadsheet you need to update the student's ID
Check your OneRoster file or ClassLink Roster Server data. Search for the student.
Copy the student's sourcedId.
The sourcedId may be formatted as an S followed by a number (example: s10157) or a number without an S at the beginning (example: 229833)—but note that the format may be different for your school or district.
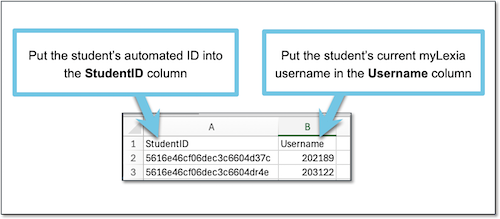
Create a spreadsheet with two columns: StudentID and Username. To set multiple RefIDs at one time, use one row per student in the CSV file.
Put the student’s current myLexia username in the Username column, and their ClassLink sourcedId in the StudentId column.
Make sure to use the student’s current myLexia username, even if it doesn’t match your school or district's username convention. The username will update automatically in myLexia with the next automated sync.
Save the spreadsheet in .csv format.
 Set Unique IDs in myLexia
In myLexia, select Settings.

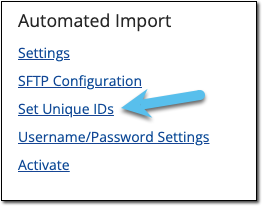
Select Set Unique IDs in the Automated Import section.
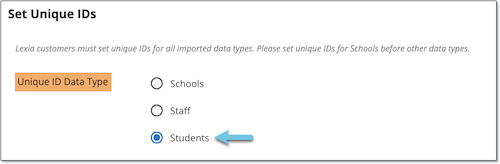
Next to Unique ID Data Type, select Students.
Select Choose File and navigate to the .csv file you created.
Select Set Ids, You should see a message that the ID was set. After you see this confirmation, select Cancel.
Once the ID is set, the student should immediately be able to log in through single sign-on and use Lexia programs. Student information such as grade and school will update with the automated sync.
In schools with automatically-controlled classes, the student’s teacher won’t see the student in their class list in myLexia right away. The student should automatically be added to their class(es) within two days.
Can I paste a student's ClassLink sourcedId into their RefID field in myLexia?
ClassLink sourcedIds often exceed myLexia's RefID character limit. Because of this, pasting a student's sourcedId into the RefID field may not always work. Using the Set Unique IDs setting ensures that the student's entire sourcedId is linked to their account in myLexia.