


Configure myLexia Settings for Automated Import setup
Overview
This article explains where to find and configure myLexia settings for your Automated Import setup. Contact Lexia Support if you are setting up automated imports for the first time and need more help.
You need to have administrative access to myLexia to choose these settings and set unique IDs. If you do not already have administrative access to myLexia, ask an existing myLexia admin to create an admin account for you in myLexia. If you need assistance with this step, contact Lexia Support.
Applies to: Educators and Administrators who have myLexia District Admin access, and some Educators and Administrators who have School Admin access to myLexia.
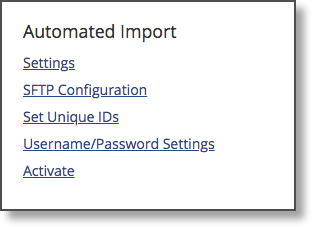
Choose settings for Automated Import
To access Automated Import Settings:
Sign in to myLexia.
Select Settings (the gear icon).
Navigate to the Automated Import section.
If you don’t see an Automated Import section, contact Lexia Support.
Settings (General Configuration)
The available settings in Automated Import > Settings are Data to Import, Class Names, Outgoing IP Address, and Summary Email.
Data to Import
Choose which types of data you would like to import:
Students only
Staff only
Students and staff
Students, staff, and classes
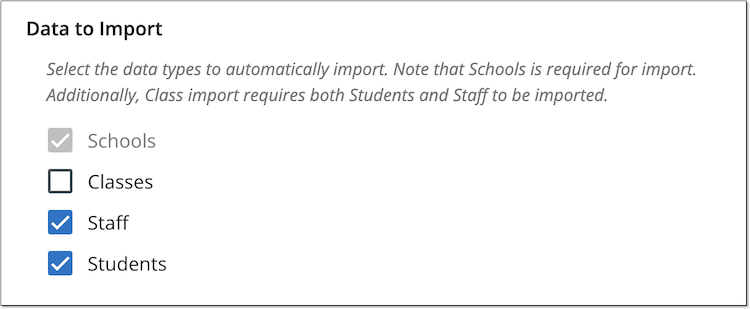
Schools are required and are automatically checked off.
Classes need to have a staff member associated with them, so if you would like to sync classes, you will also need to import students and staff.
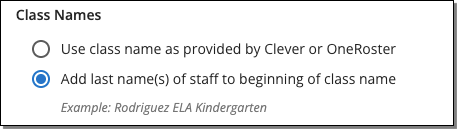
Class Names
Choose how you would like Class Names to be displayed:
Use class names as provided by Clever or OneRoster
Add last name(s) of staff to beginning of class name
Outgoing IP Address
Before you can start uploading files to Lexia’s SFTP server, we will need to add your IP address to our allow list.
If this field is not already filled in, enter one public IP address that you will use to access your folder on our SFTP folder. We will add the address to our access list.
After adding or changing the IP address, access to the folder will take up to two business days.
If there is already an IP address (other than 127.0.0.1) listed and it is not the address you plan to use, contact Lexia Support. If the address is 127.0.0.1, it was added as a placeholder, and it is safe to replace it.

Summary Email
If this field is not already filled in with the correct email address, enter the email address of one person who would like to receive the nightly automated import summaries.

Save changes
When you have finished making changes on this page, select Save. IP Address and Email Address fields are required, and you are not able to save unless those fields are filled in.
SFTP Configuration
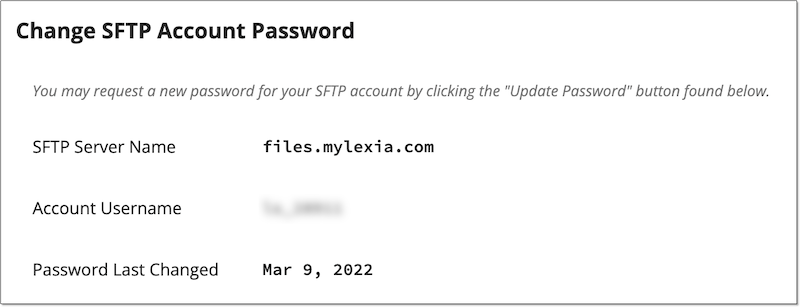
The Automated Import > SFTP configuration page has information on how to access your folder on Lexia’s SFTP server. From there, you can upload your files, see your import files, and see error logs when you need to troubleshoot.
the SFTP configuration page shows Lexia’s SFTP server name, your account username, and the last date your password was changed. You also have the option to update your password here.
If you see a button that says Create Account, contact Lexia Customer Support.
Account Username: Your account username is created using the following naming convention: [customer initials]_[uniqueCode] where [customer initials] is the combination of the first letter/number of each word in the customer’s name (e.g., wsd2 would be the customer initials for Washington School District 266); [unique code] is assigned at random (e.g., wsd2_875).
Account Password: If you already know your account password, you do not need to do anything on this page besides make a note of your username and the name of our SFTP server (files.mylexia.com).
If you don’t know your account password, select Update Password, and a new password will be generated and displayed. Make a note of this password, as it will not be displayed again.
Check with your colleagues to see if someone else uses this password (for instance, for automated exports) before you select Update Password.
Student Username/Password Settings
Student Username/Password Settings
In Automated Import > Student Username/Password Settings you are able to choose username and password conventions for student accounts.
Usernames and passwords are required, but including student usernames and passwords in your import file is optional. If you send a username and/or password, leave the default “provided” option selected in the username and/or password settings.
If you choose to not send student usernames and/or passwords in your import file, student usernames and passwords can be built from information that is included in your import file.
If you select an option besides “provided username” or “provided password”, make sure you populate the appropriate field in the CSV files. For instance, if you choose “Student Number” for student password, make sure that you have included and populated the column “Student Number” in your .csv file. For more information, see Fields for Automated Data Import: Students.
If the student username and/or password convention you choose differs from your current conventions, please make sure to communicate these changes to your staff so that they are prepared with the new student login information.
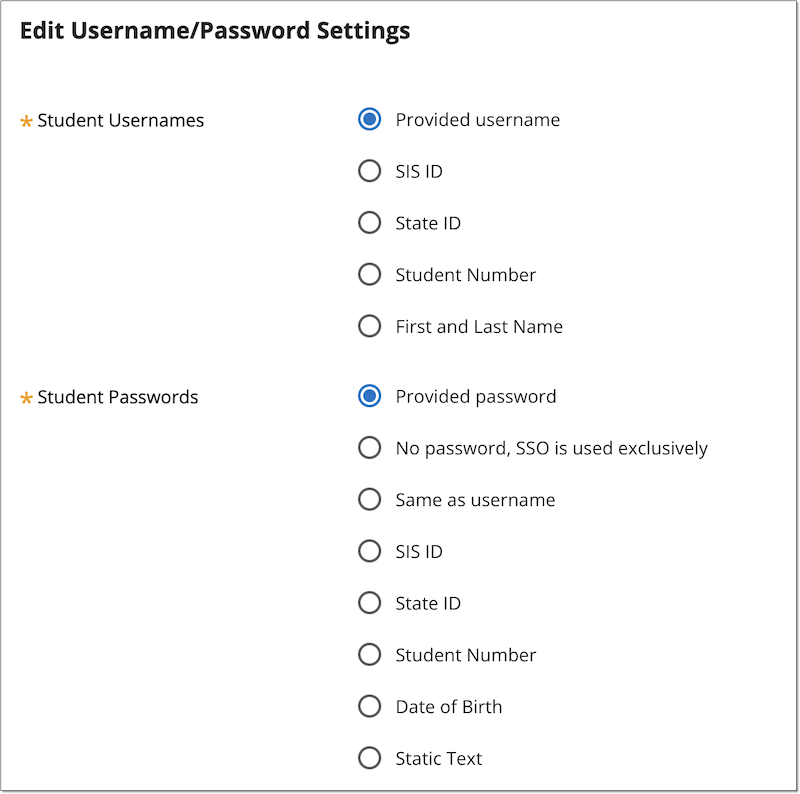
Student Usernames
Your choices for student usernames are:
Provided username—If you select Provided Username, make sure that the username field is populated, included in your student import file, and that provided usernames have a minimum of four characters.
SIS ID
State ID
Student Number
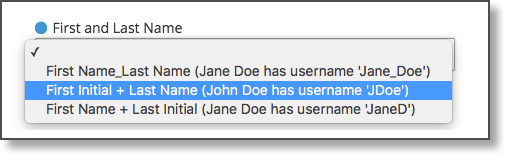
First and Last Name: If you choose First and Last Name, you can choose from three conventions from the populated dropdown.
FirstName_Last Name
First Initial + Last Name
First Name + Last Initial
Important information about usernames:
Usernames must be unique in a district
If you configure the student username to be generated based on the student’s first name and last name, in the event of duplicate usernames, the second and subsequent usernames will have an underscore and a number appended to the username, e.g., amartin, amartin_1, amartin_2. In a large district, where duplicates are likely to occur, this convention can cause confusion for students.
If you configure the student username to be generated from the SIS ID, State ID, or Student Number, any duplicates in the CSV file will be flagged as an error. The first instance of the username will import, and the second instance will not import and be flagged as an error.
Usernames must have a minimum of four characters
If you configure the student username to be generated based on the student’s first name and last name, this may result in usernames that do not meet the four character minimum. In this case, myLexia will prepend the username with a “1” or “11.” For example, if the username scheme is first initial + last name, Michael Ho would have a username of 1mho.
If you configure the student username to be generated from the SIS ID, State ID, or Student Number, any value less than four characters in the CSV file will be flagged as an error, and will not import.
Student Passwords
Student passwords can be selected or built from student information that is included in your import file.
Provided Password: To use a password you include in your import file, choose Provided Password. Make sure that the password field is populated in your student import file and that provided passwords have a minimum of four characters.
To build a password from fields included in your import file, choose any one of the following:
Same as username
SIS ID
State ID
Student Number
Date of Birth
To choose one password to be used by all students, choose Static Text, and type the password in the box.
Important information about student passwords:
Student passwords need to have a minimum of four characters.
If you configure the student password to be generated from the SIS ID, State ID, or Student Number, any value less than four characters in the CSV file will be flagged as an error, and will not import.
Student passwords need to have a minimum of four characters. If your password convention results in passwords that do not meet the four character minimum, myLexia will add a “1” or “11" to the beginning of the password.”
Choose whether to allow exception students
After you activate automated imports, If a student account is created in myLexia, then the account will be an exception account and will not be controlled by the automated import. You can turn off the ability to create exception student accounts.
To allow exception students to be created:
Select Settings.
Under General, select Site Settings.
Select the Data Security tab.
Check the Allow Exception Students to be Created box.
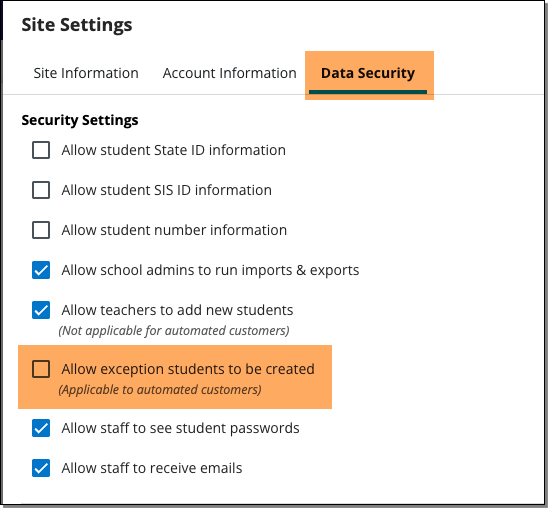
Select Save.
When this box is unchecked, no one can create exception students. If you need to create an exception account in the future, you can re-enable this feature.